9/11/20

Ye Old Crow's Sweet Shoppe


This is a new addition to the haunted house family =). I decided to make the area behind our kitchen sink into a sweet shop. An Old Crow's Sweet Shoppe, that is. It was super simple because I had many apothecary jars that were just sitting around beeeeegging to be used. I also had this cute sign of a crow but needed to make it more into an official sign for the shop. My friend Libby cut out these amazing gothic letters using her Cricut machine. Then I glued them onto black foam paper. Cut those out, glued it onto the sign and VOILA! Below you'll see fun canisters filled with ghoulish delights and tasty treats. I decided not to make labels for them this year (because it's so much more fun to have people ask), but maybe next year I will. Here's what we came up with:

Moss and Dollar Store eyeballs = "Eyes Cream"

Craisins = Blood Clot Berries

Candy Corn = Witch's teeth
Black Licorice = Spider legs
Black and Navy beans = Bat droppings

Skulls & moss = Skull Candy


I loved using every available space in my home for decor and this spot just never felt right to me each year. I'm SO excited to add more each year and get more creative. Have you made a Halloween sweet shop? Tell me about it!


9/9/20

Coffee Filter Wreaths With the Cozy Coffin

Hi friends! My name is Libby over at The Cozy Coffin and I'm so happy to be taking over today at Classy! Today we are talking about cute wreaths!


I see these Coffee filter wreaths everywhere but in white. For Halloween I thought it would be a great change to have one in black. But how would be the best way to get the deep dark black I was looking for? Pre-dyeing all the filters with craft paint was one suggestion I came across, but the time for them to dry and the mess just wasn’t something I was up for. So I decided to experiment and see if making them first with just the coffee filter and then spraying it with black spray paint would work. It did! It’s an easy,  inexpensive craft that just takes about 3-4 hours to make. That’s two Halloween movies! Here’s what you will need:

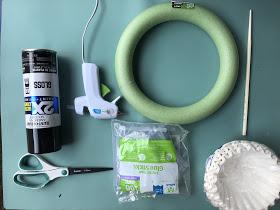
  • Dollar store foam wreath 
  • 1 pkg coffee filters ( dollar store)
  • Glue gun
  • Glue sticks
  • Chopstick ( or something to hold coffee filter onto foam)
  • Scissors
  • Black spray paint 
  • Black, orange, white ribbon


Get comfortable! I just sat in my comfy chair and had a side table with a place to put my glue gun and hold the coffee filters and glue sticks. 

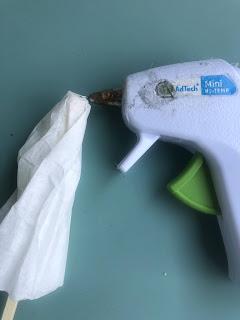
Take 1 coffee filter and twist it onto the chopstick 

 
Squeeze some hot glue on end

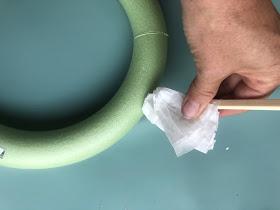
Then place on foam wreath, if it doesn’t stay, try putting a a little in the foam wreath where you are placing it. 


Make sure to hold it there for a minute, until glue is mostly cooled
Get your next filter and repeat the steps, place filter next to first one 
Keep adding filters around the front and side of wreath, don’t do the back

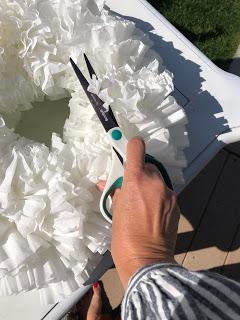
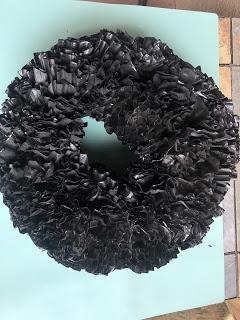
After it all filled in, you will notice some unevenness, just give it a haircut

Next you will spray it black. I just put mine on my grass. You will be using quite a bit to get in all the nooks and cranny’s Make sure you don’t overspray, just keep going back and forth and look at it at all angles. Don’t worry about getting it to deep, just what you can see. 

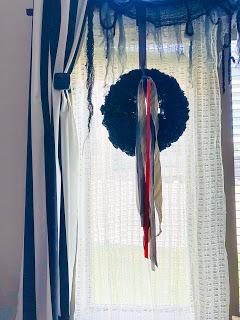
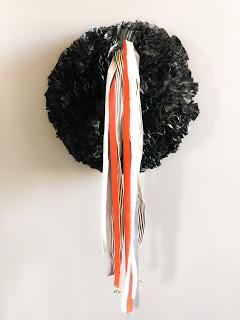
I then grabbed some ribbon and attached it. I love the old time feel of it! 

I put it with some old lace curtains and some black drapery material, perfect for my haunted mansion! 
 
Happy Crafting everyone! Be sure to come and see me over at the Cozy Coffin for more fun!

9/8/20

Flamingos Turned Vultures

Have I got a WAY fun, transformative Halloween craft for you today!!!!! I saw an image on Pinterest that just about knocked me down on my backside. I was maniacally laughing and so giddy to tackle the project myself =D. The image I pinned didn't have a tutorial but it's pretty straight forward. What you need are some lawn flamingos of any color (can you believe the ones I found were yellow?). We found them on a yard sale site making them WAY cheaper than Amazon but if you're in a pinch, Amazon will do. Libby even found mini ones on Amazon and we split them between us. Imagine, BABY vultures!!!! If you are determined to get a good price, I may suggest you wait till the beginning of the spring and or summer season next year and get them at the Dollar Store.


First things first, you must decide the color of your bird. I referenced the Jungle Book vultures for color ideas. We headed to Walmart and bought primer, Clarinet Wine (a nice deep maroon), a matte or satin black, and a semi-gloss clear to coat the finished bird and to help protect against UV rays.


Now, let's talk about primer...THIS IS IMPORTANT...we used two and they had VERY different outcomes when used on the plastic. I was on the spray paint aisle for forever reading the backs of all the cans. So many of them said that it would work on most plastics. I know that primer is very important and being a makeup artist and seeing the effects, I don't skip that step. Read here to chat makeup primer. I know that we needed to coat our birds with something that would adhere to the plastic and then allow any other paint we used on top, to adhere to IT. I know that if I were to have just gone in with the Clarinet Wine, it would have cracked and not covered well. We used a semi-gloss white primer + paint and then a matte grey primer. Who won? 

The matte grey primer hands DOWN!!!!! I think the sheen was a mistake on the other one AND the fact that it was primer + paint. the semi gloss white was extremely patchy and when it finally dried and we began to spray other colors on top....it crackled. We were SO disappointed and were left wondering if we had ruined a few of the birds. TRUST us, go with this matte grey primer for ALL your priming needs!!!!


We proceeded to wiped down our bird decor very well so that we wouldn't be priming and painting over dirt and grime. We also taped the beak since that would be a different color. We just stuck them in the grass and started spraying. Please be sure to do this on a NON windy day for yours and others safety!


Isn't that grey primer amazing? Look at that smooth finish!!! Now it was time to tape the neck since we will be painting the head and the body two different colors.


After the primer is dry, then it's time to grab either your deep red or your black. I decided to start with the head. I really loved the sheen satin when doing the heads. It gave it just enough luster without going too far into the glossy family and having them look too plasticy.


Are you already DYING at how amazing these are looking????? Well, we were LOL! =D Then we just needed to spray the bodies black.


At this point I was giggling like a silly school girl at how this craft was turning out LOL! We let them dry in the sun and then brought them down to the basement where we had glue guns, mini feather boas and black acrylic paint waiting.


We bought all these mini boas from Jo-Ann Fabric and Crafts and they were the PERFECT size! A normal sized boa would have been WAY to over powering. We first measured length, then cut and used hot glue to attach them, making sure the seam would be at the underneath of the neck (just in case you could see it). We used white and brown and I can't tell you which one I liked more. They BOTH looked amazing!!! If I make any more, I will be using a brown speckled feather for sure to add some interest to this group.


Now, notice on this last picture how the paint is missing where the head and beak meet? Easy fixes, but it basically happened when taking the tape off. The tape would adhere to the paint and take some of it away BUT NOT TO WORRY!!!! I held up a cloth around the beak and just sprayed a touch of the Clarinet Wine and it covered it perfectly. You can do that with any color you are needing to correct. One of the gals even used a touch more of the black to blend her neck and head together just in case it showed under the boa.

We used black acrylic paint to paint the eyes and beak after gluing on the boas. Then we stuck them in the grass again to dry in the sun. After all was said and done we sprayed them with a few coats of the clear coat (same thing I used on my fairy village). This will give them luster and protection from the sun.


It's up to you how these new characters of yours will congregate on your lawn. Will it be over a grave with bones? Maybe a severed hand and or foot? Maybe attached to a branch of your tree? You can even perch one in your window box! SERIOUSLY I want to see if you do this and HOW you do it!!! Be sure to comment here or tag me on IG (Classy By Jen) or FB (Classy By Jen).


9/7/20

Over the Top Halloween Decor


I have this friend, let’s call her Libby...because most people do...because it’s her name lol. Every year she throws an amazing Halloween party where we come dressed up, we have amazing food, then cackle and craft with our fellow witches. I look forward to it every year and love seeing what she does with decor in her home. One year it was a haunted circus theme, one year it was Disney’s Haunted Mansion. One year we came in to see that her entire living room had been transformed with netting and strips of fabric hanging down from her ceiling. So many different textures and accessories. She used burlap, lace, hanging bats, bed sheets etc. I couldn’t stop staring at it. It was amazing!!! I asked her if she could teach me how to do it and being the gracious person that she is, she emphatically said YES and we planned a work day. Before she came over, there was a list of supplies I was to go and get. Here’s what I bought and what you’ll need to get the same look:


  • Poultry netting (this is the one I got)

  • Fabric cut into strips (be creative here)

  • String or yarn to tie netting to chairs

  • Open hooks to hang netting (this is what we bought)

  • Zip ties (if needed)


The netting:


We bought this poultry netting from Home Depot and I was amazed at how cheap it was going to be to get enough for my living room, indoor AND outdoor entry ways! I took all four corners and used the string to tie them to chairs. You’ll need a lot of room to be able to pull the chairs far away enough from each other to loop your strips of fabric over and under. 


The fabric:


You can get super creative here. I went looking for sheets at second hand stores and yard sales. I didn’t limit myself to color though. I was either looking for black, the perfect shade of purple or super light sheets so that I could dye them any color I wanted. I used RIT dye from Walmart to do that and just followed the instructions on the box. Burlap, lace, ribbon, rope, hanging candles, bats or mini skeletons would also be super cool. If you use rope you can take either hot glue or spray insulation foam. You can then paint it black or green or red. The sky really is the limit here and I can’t wait to see what YOU do (be sure to tag me so I can see).


Here's a video showing what you do after you cut your strips of fabric (or enlist your family to help cut them LOL)


To attach these to our wall, because they can get a little heavy with all the fabric, we used these hooks from Home Depot. We leave the hooks in year round and with our 18' ceilings, you can't see them at all throughout the year. You can always paint them the color of your walls as well to make them disappear.


Kevin got up on our super long ladder and attached one side, then took it to the other side. It's a little bit tricky getting under all the netting and fabric to do this so BE CAREFUL and go slowly. In the picture below you can see another blue ladder just out of the frame. I got up on that and would hold the other end of the netting while Kev was hooking them up so it took some weight off him. Hope that made sense =).


Here are the two shorter ones I cut for the front entry way. It's seriously SO cool to walk under!


Now if you have a light fixture in the middle of your ceiling....things can get interesting =). We
hung one side and then pulled it taught, measuring where we would need to cut the netting. We made sure to cut only as far as we needed to, put it around the chain of our chandelier then re attached it with zip ties.


The finishing detail would be to add string lights to each swoop to add some ambiance to the room. I typically don't like having too many house lights on during the party and these cover up those lights a lot anyway. The ball string lights are PeRfEcT!!! Here's a pic one of my guests took last year. It's dark but you can still kind of see the cool effect.


Here's the front porch last year. I'll be doing a second one this year to give it a more full effect. To attach these Libby used office brads and clipped them to the soffit of the ceiling. GENIUS I TELL YOU!!!!!!


Hope you guys enjoy this and for SURE do it at your home too! be sure to send me pics and tag me on my channels.